|
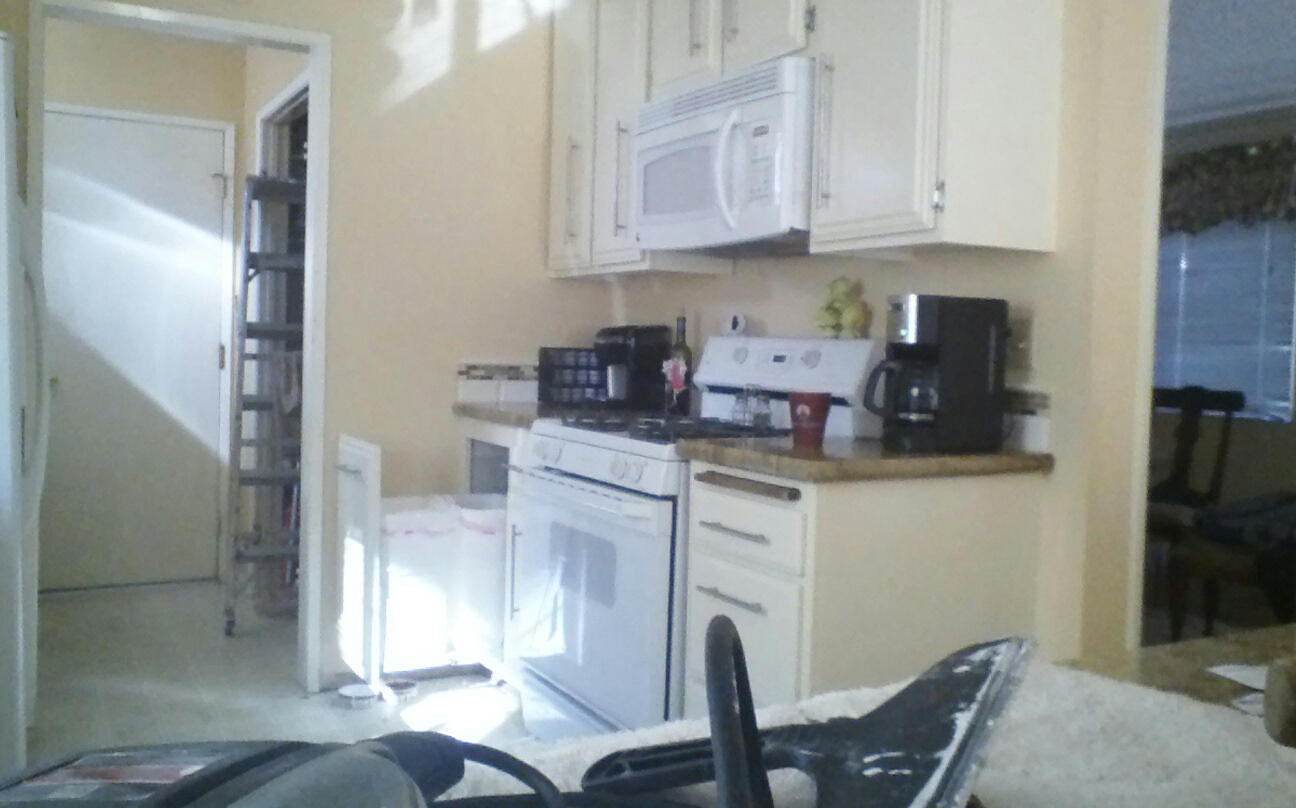
| Kitchen Project 2013 |
| My Kitchen needed a face lift.
I also decided to put in a Penny Floor (US Mint)
I did 98% of the work myself.
Update: Warning on Penny Floors: see end of post
consulted: Chris Carter of Carter Tile (805) 338-7297
Plumber: Devon Angel (805) 660-2007
Electrical: Doug Flack
I received excellent service and advice from these professionals!
27,694 Pennies
Started the kitchen project June 1, 2013, Ended October 26, 2013.
This is the full story.
The after photos
Photos of the finished kitchen can be found here: Finished Kitchen Photos
Step one: Hanging Cabinets and ceilings:
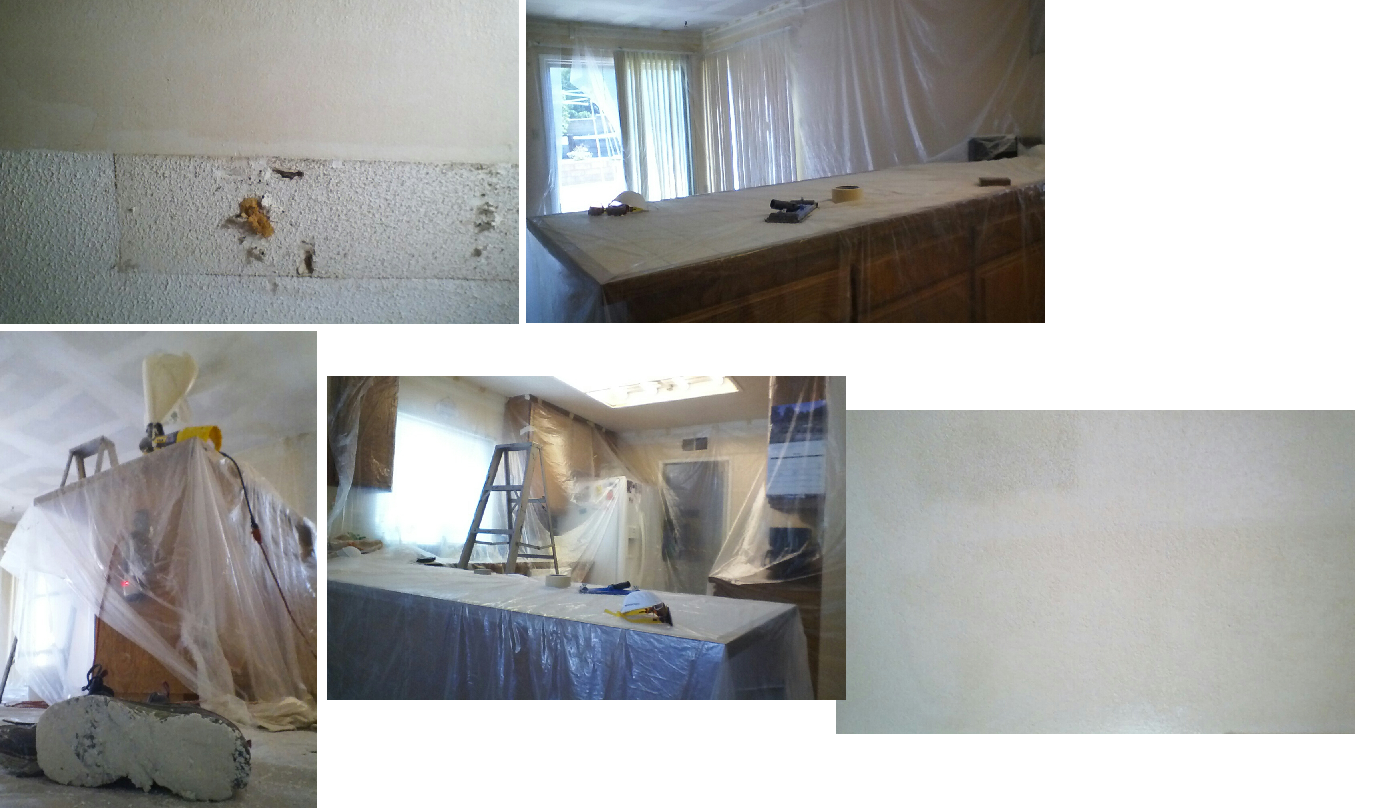
I wanted to remove the hanging cabinets that separated the kitchen from the family room. The problem is that the kitchen ceiling is flat textured, and the familyroom has popcorn ceilings. If I pull it down the ceilings won't match. The estimate from the kitchen contractor was 1000.00 to remove the popcorn ceiling, that included texture and paint. Lucy texted me in late May to look at the Conejo Deals for the day, and there was a special to remove 200 square feet of popcorn ceiling for $99.00 (my family room is just about that size). It is just for the removal of the popcorn, but for a $900 savings, I can texture and paint it myself. I have textured walls before and painted ceilings before, so I think I will give this a try. Made my appointment for the removal for June 10th, but first I need to removed the hanging cabinet.
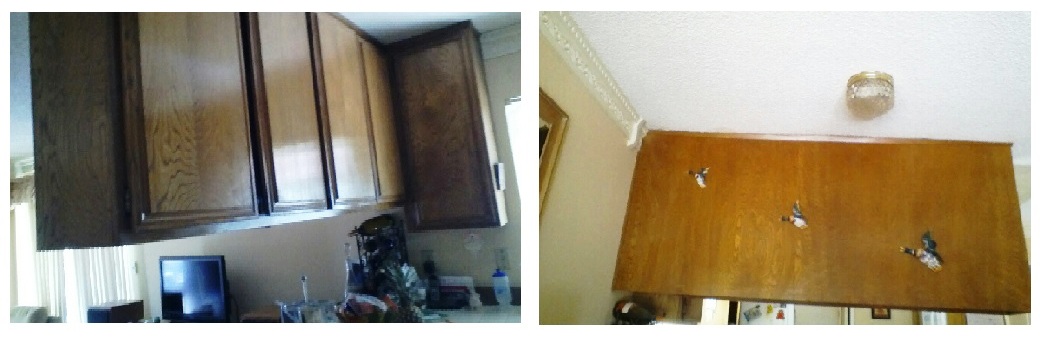
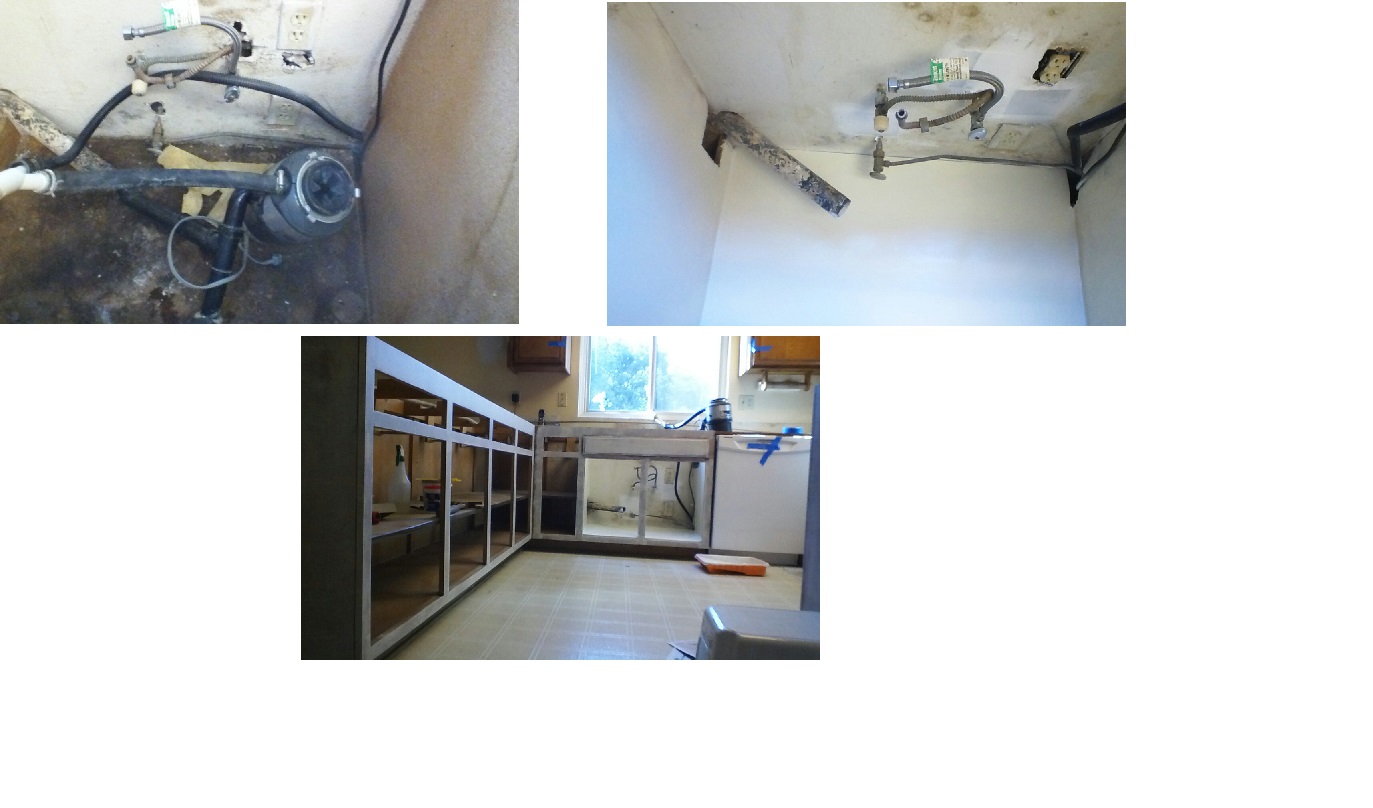
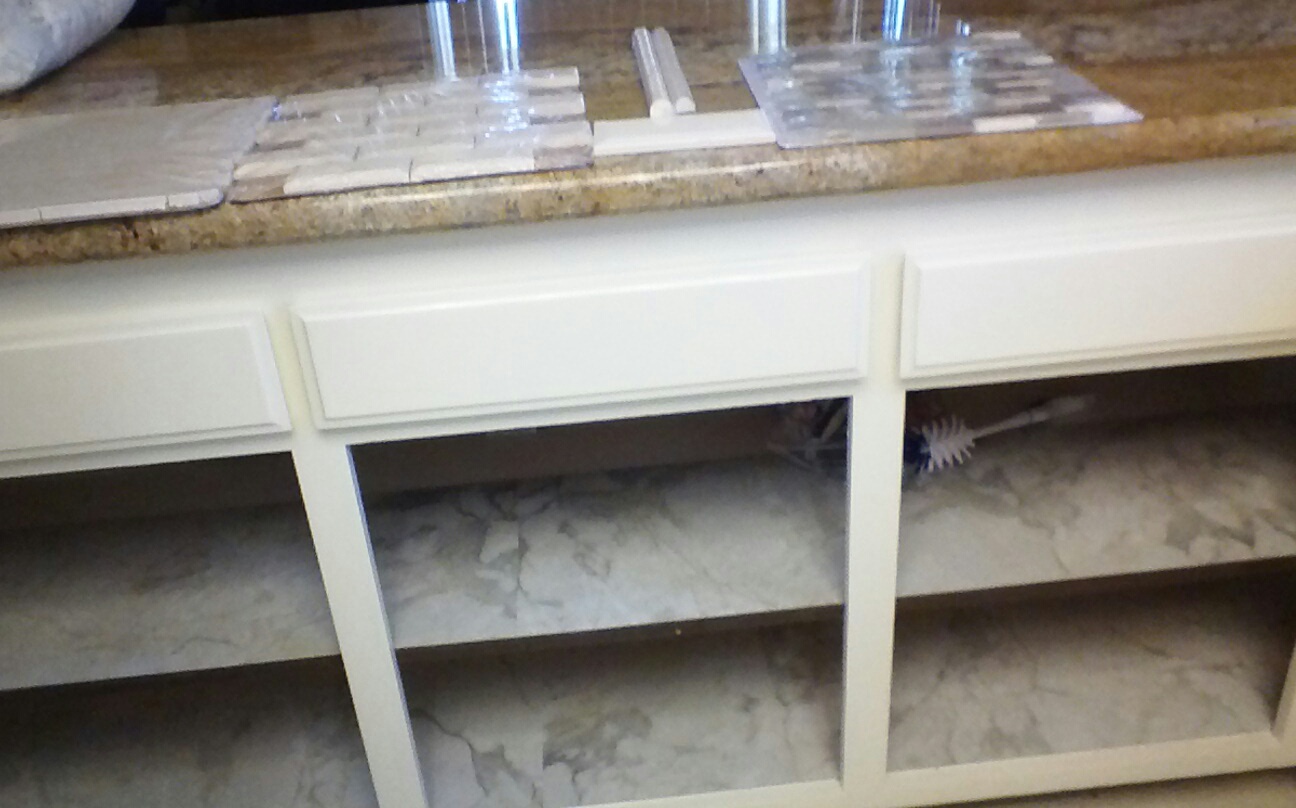
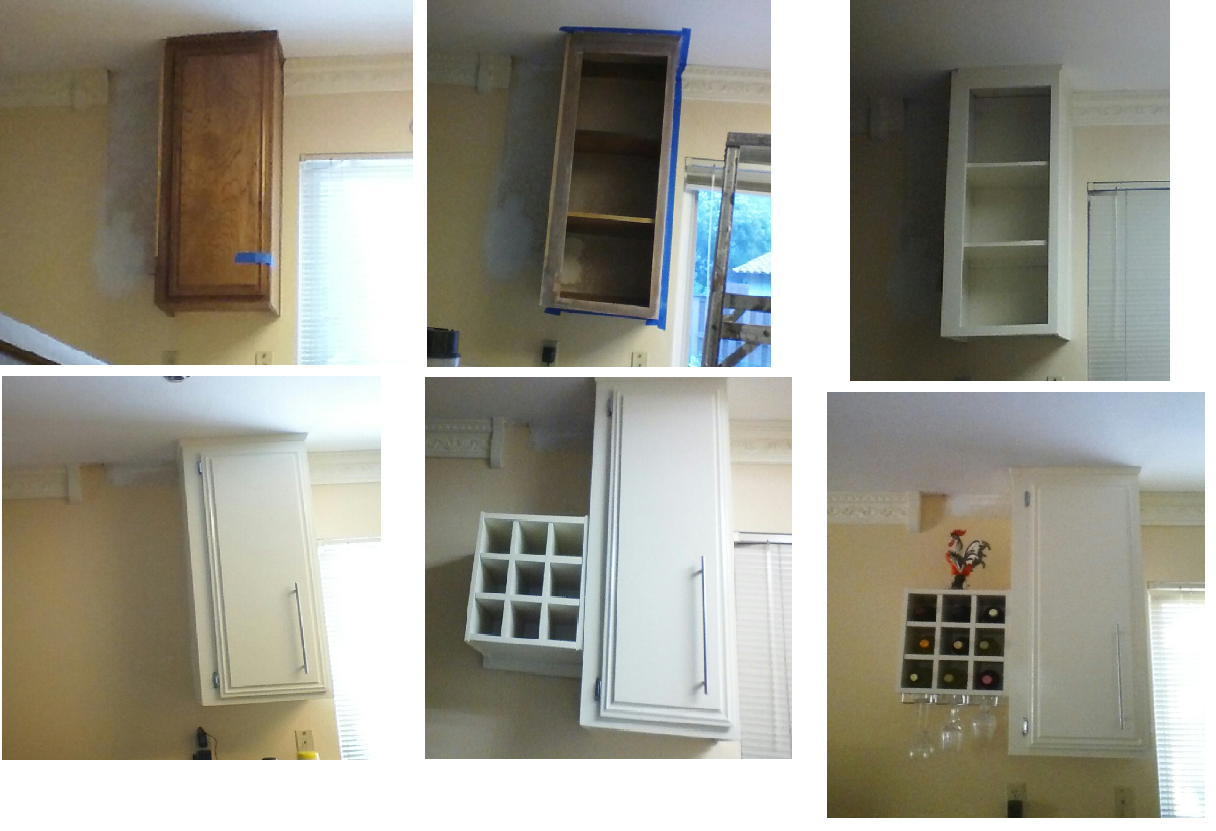
Removing the cabinet: 3 areas inside of the cabinet there are 5 screws into the ceiling. Okay I can do this! I set up plasitc crates on the counter under the cabinets to make the drop just a few inches. Had my two daughters in place to help me, remove the screws, and nothing happened... what the heck. I removed a little cover board and I found that they had hammered at least 15 nails under each panel. I could not pull the nails out, so we slowly rocked the cabinet back and forth, putting presure on it, one side began to give, then the whole cabinet came down in one piece. It did a bit of damage to the ceiling, no worries, easy patch job. That cabinet was heavy over 7 feet long, we got it into the garage. I was hoping to recycle the cabinet and use it in the familyroom under the counter, but it is too tall. Not a total waste, I will use the cabinet as a test project to see if I will paint the kitchen cabinets or not. It is oak, and has a lot of grain in the wood, really do not want the grain to show through the paint.
My family room was 200 square feet, and the popcorn finish was removed. The next day, I put up plastic and started to texture the ceiling. What a messy job that was. The next day I painted the ceiling. Wow... painters deserve every cent!!! It is hard work to texture and paint. It turned out okay, I can see there is an art to making it look good.
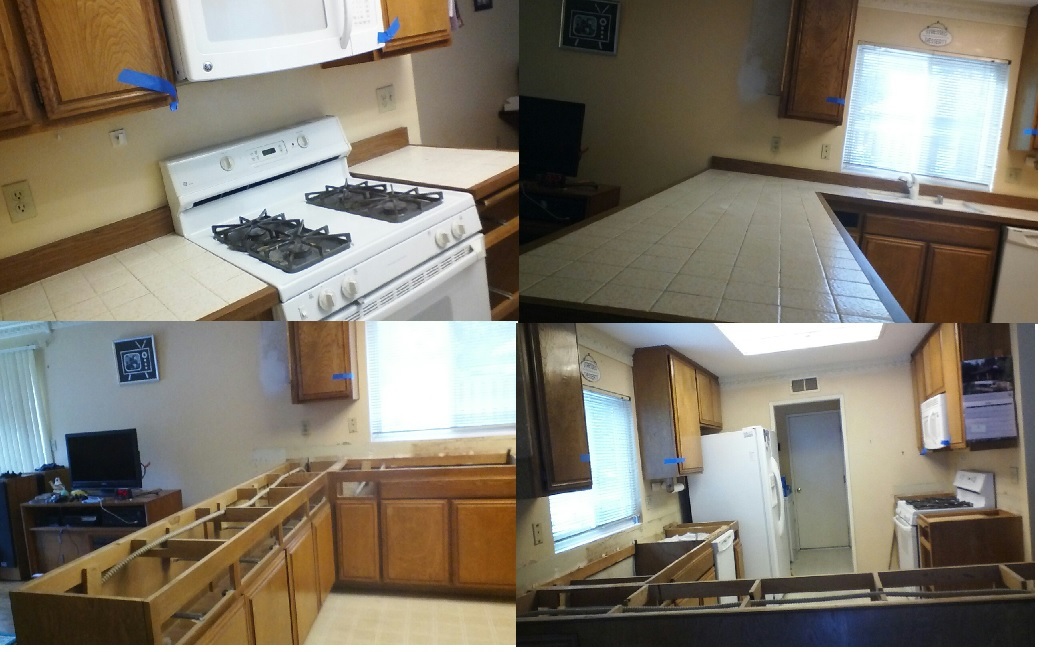
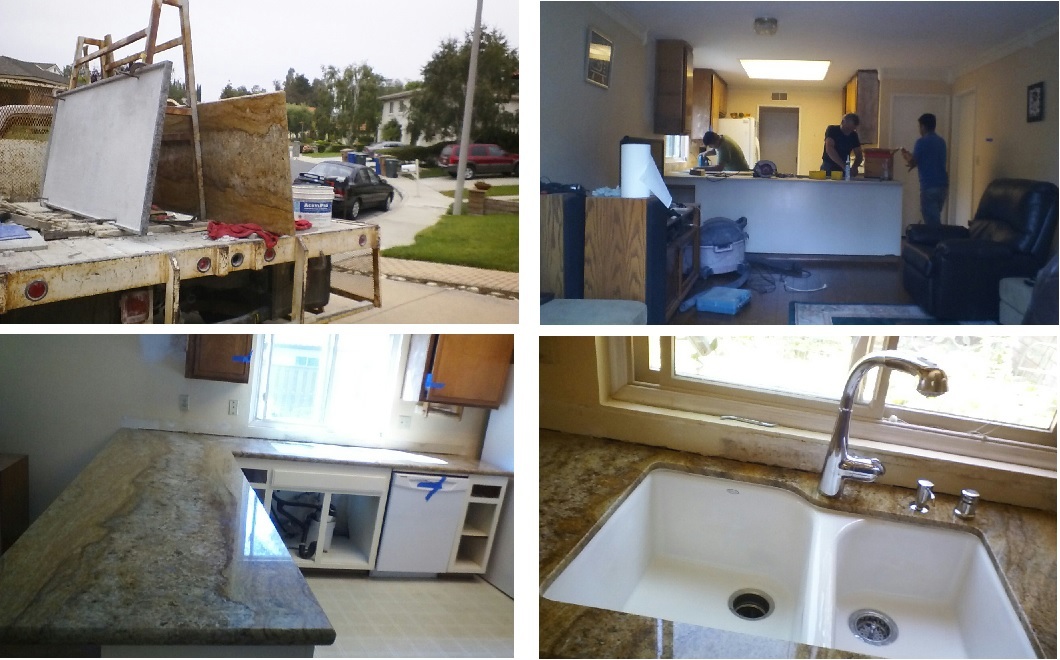
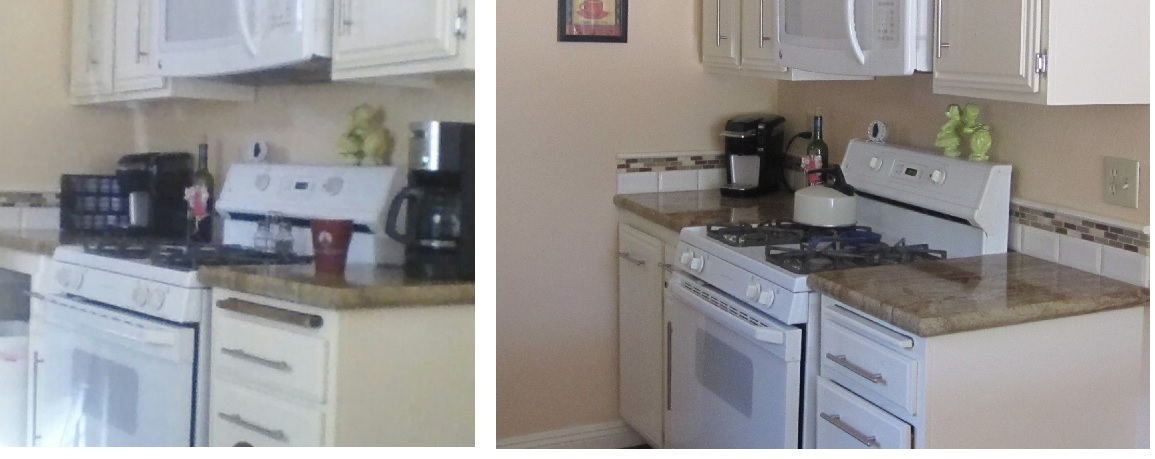
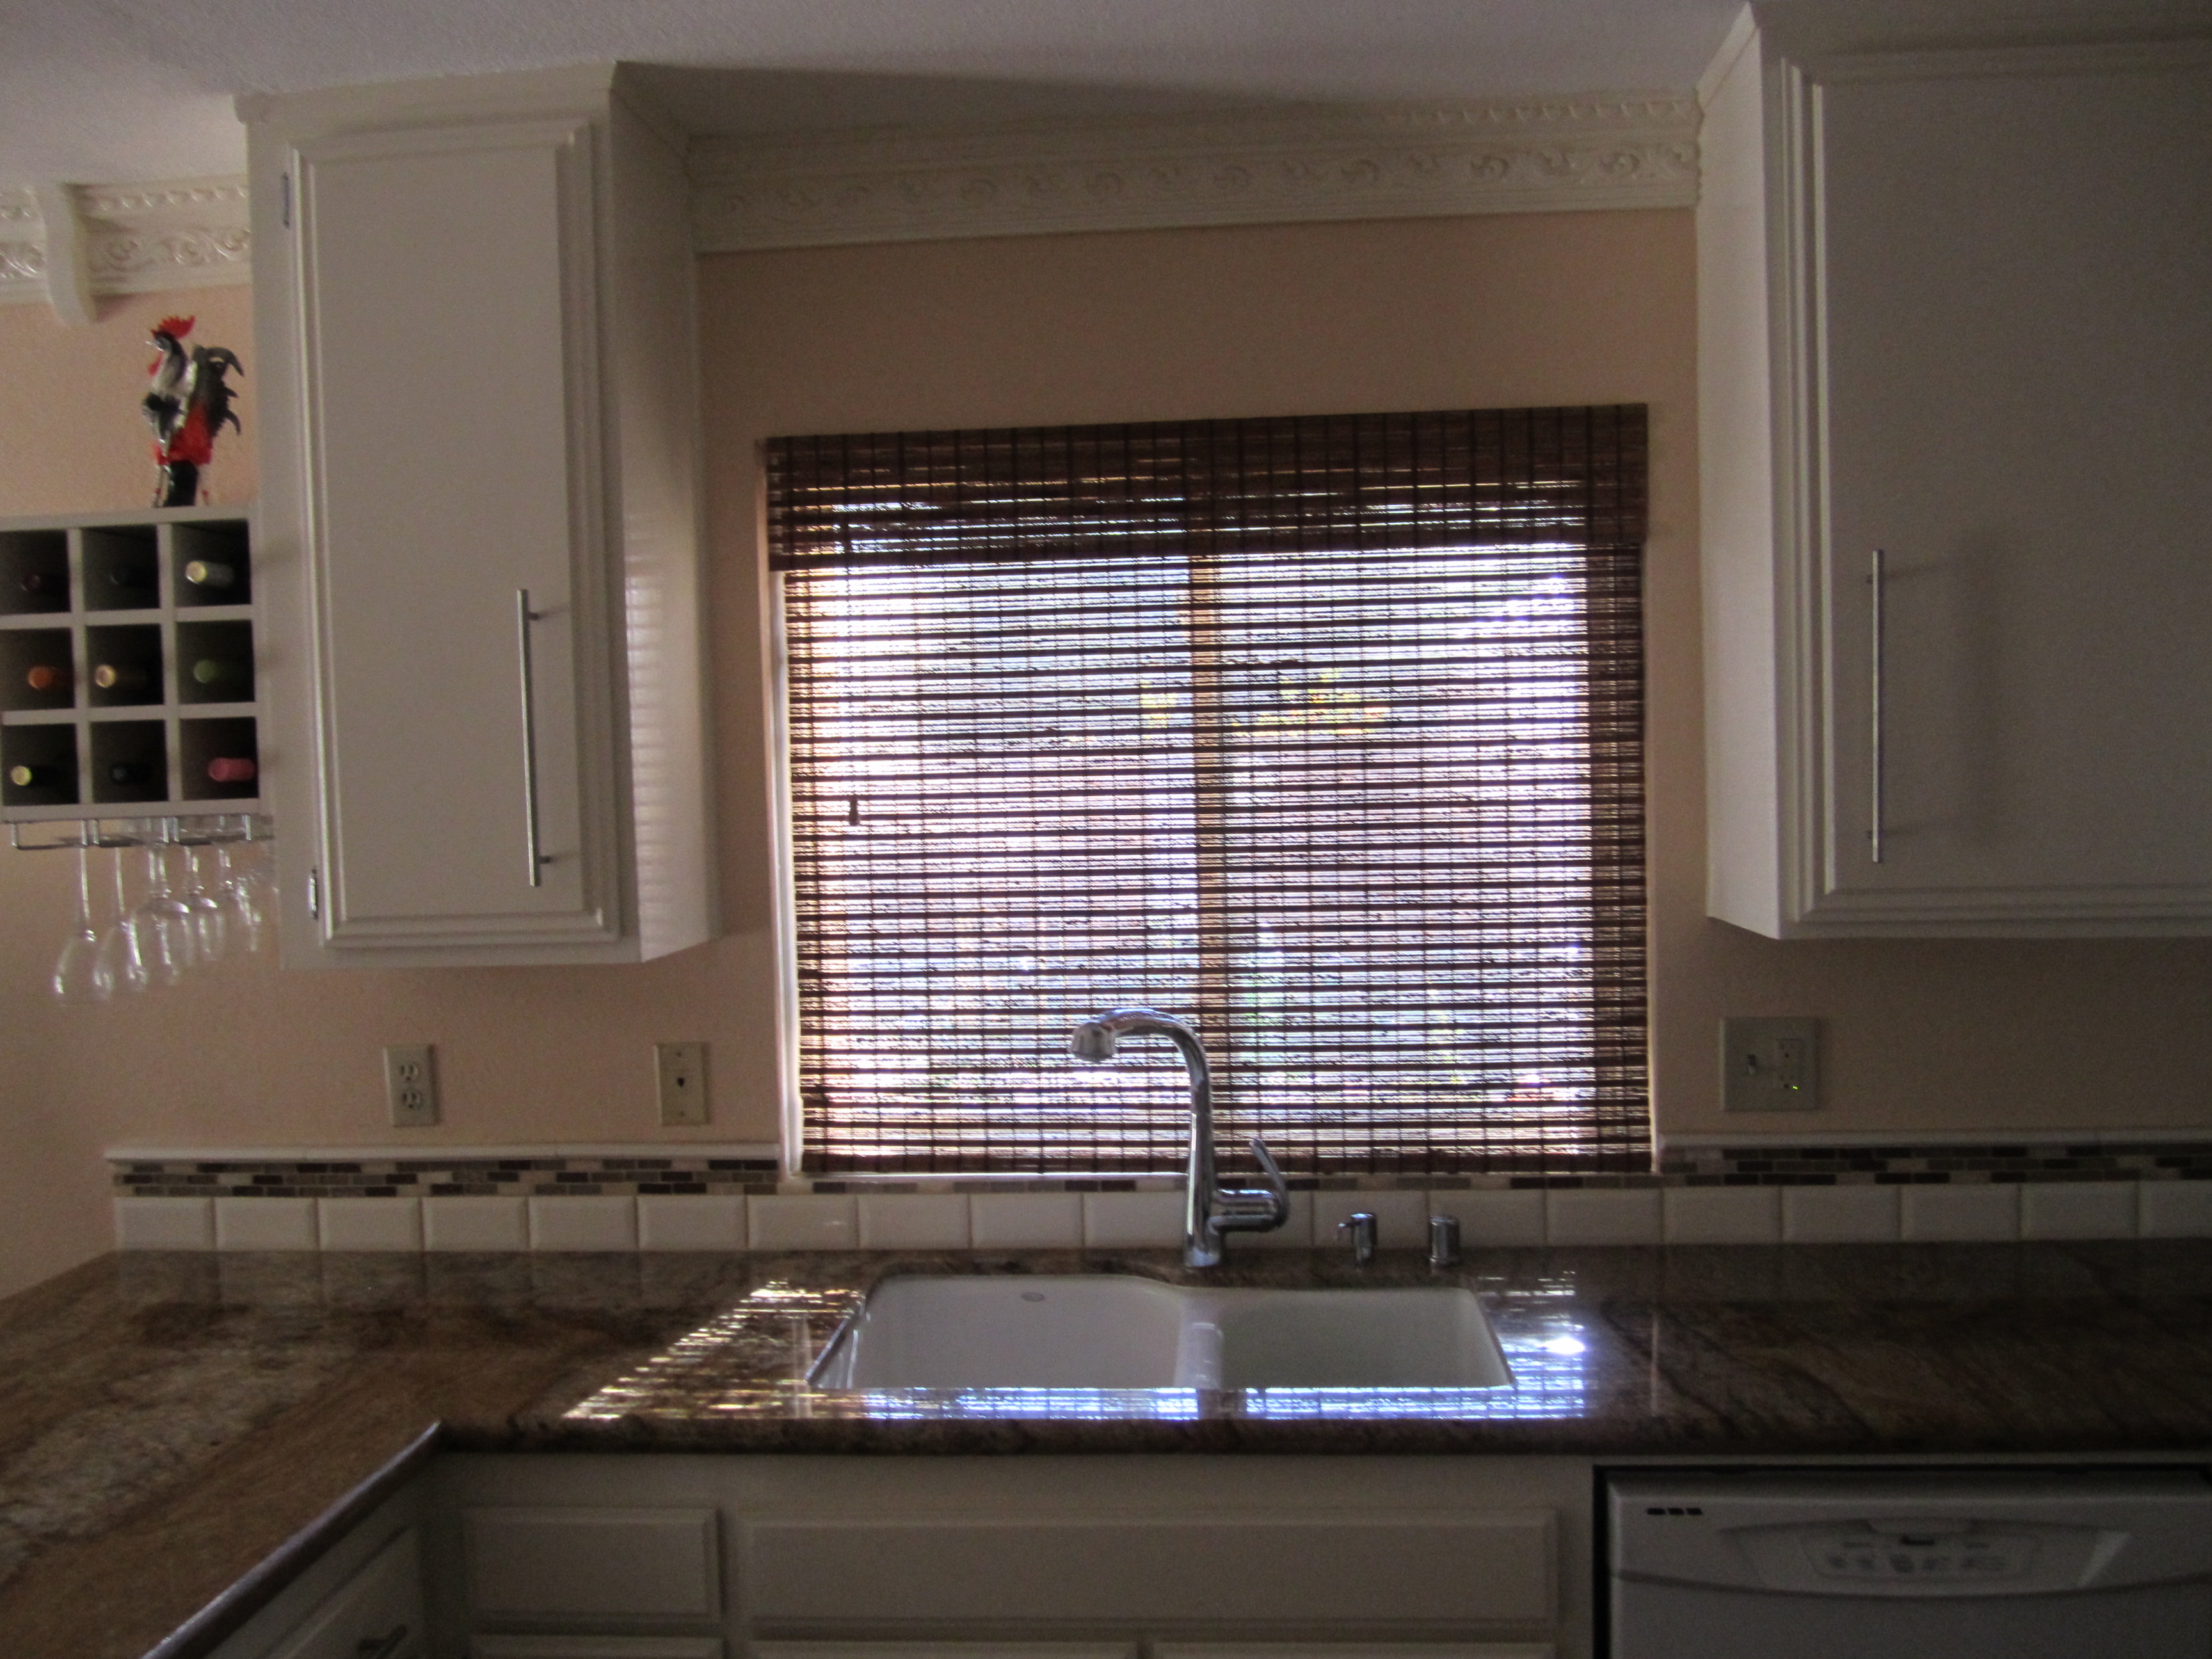
With the ceiling done, next was the counter tops. This was going to be the most expensive part of the project. We went back and forth to what kind of material to use. Mike saw a piece of granite that he really liked. I have to admit it was something I would have never picked out but I decided to go for it. I think I surprised him, I wanted him to be a part of what was going on. We ended up buying the slab from Auoura Hills Marble and Granite Inc, name of the color of the granite was Copper Canyon. Customer service was excellent. The slab cost $1,316.18 (to be exact), and the cutting and labor to put it in was $1,680. I had to get a new sink and faucet, holy cow.... total cost for sink and hardware $1,147.99 Plumber had to reroute drain around the much bigger sink and get everything connected, cost $225.00.
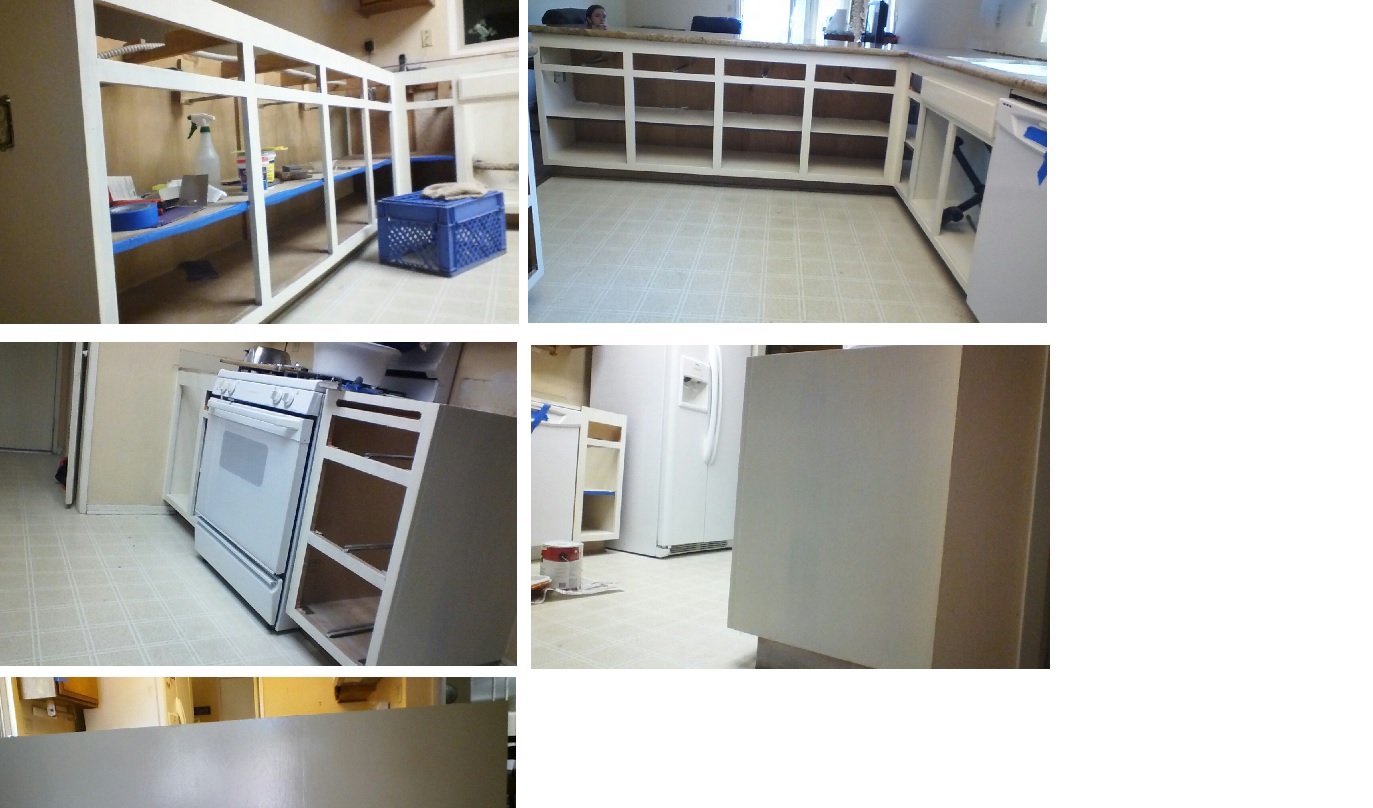
After they removed the countertops, I realized that I had a problem with the cabinet under the sink. It was dry, but it was discusting. I removed the bottom of the cabinet and replaced it. Cost was under $10, the labor I did myself, patched and painted. It was so much harder than I thought it would be, took me the whole day.
Next I had to prime and paint the lower cabinets before the counters went in. I had a week to get this done. After sanding the oak cabinets, I primed and sanded, it was at that time I found out I could not use the electric sander on the primer(it got too hot), I had to hand sand it. I put 3 coats of primer, sanding between each coat, and two coats of high gloss paint. I also painted the inside of the cabinets.
The week went by very quickly, although it was tough not having a sink in the kitchen. The counters where in within an hour of them getting there, and the plumber came an hour later to install the faucet.
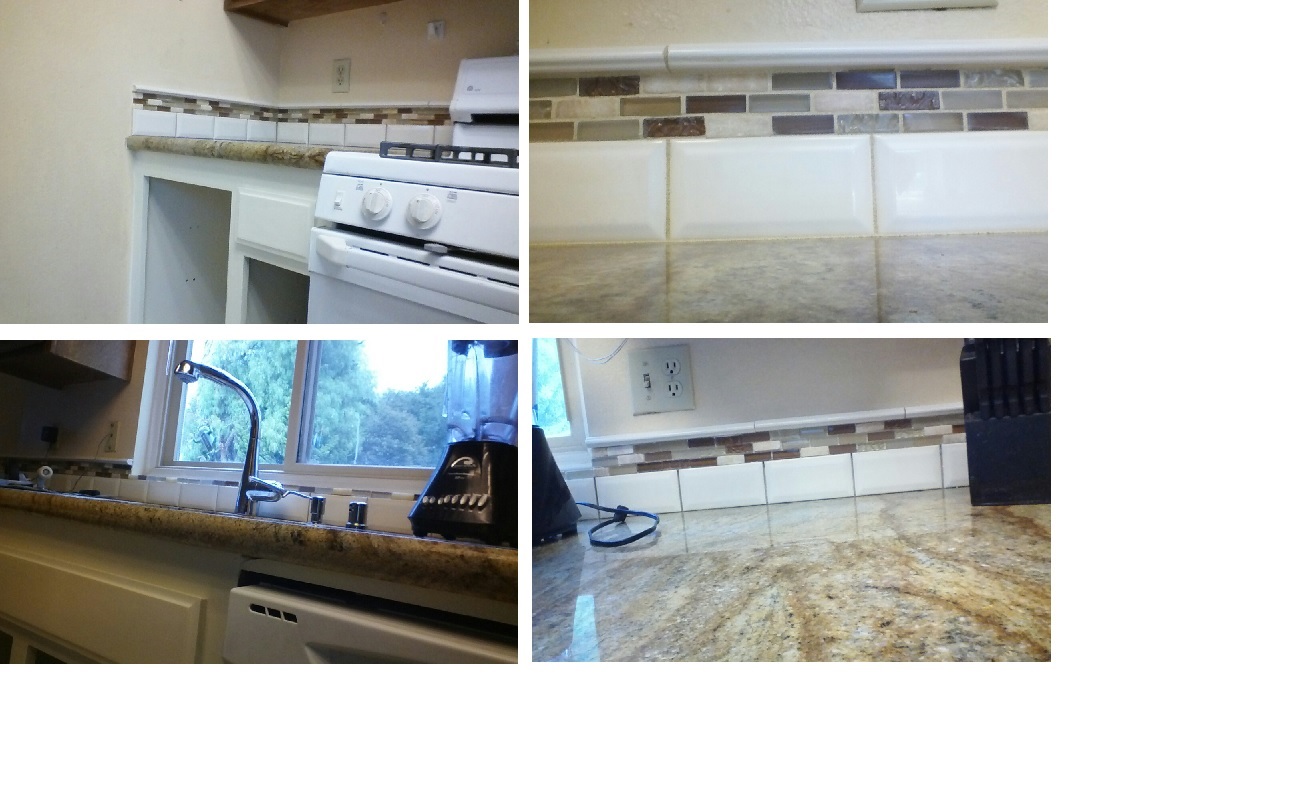
I realized once the sink was in, the faucet was very close to the drywall and was getting it wet. The upper cabinets could wait, the back splash was going in next. I decided on ivory subway tile with a glass/rock mosaic trim. I could always add subway tile up to the cabinets later if I so desired.
Instead of lining my cabinets and drawers with paper, I used floor tiles to line the cabinets, easy to keep them clean!
Now the upper cabinets, I will be on a ladder and must be careful, most of the time I am by myself in the house. I put 3 coats of primer, and two top coats of paint. This took much longer than the lower cabinets, reaching to sand and paint was very hard on the back and shoulders. Also painted the inside of the cabinets and painted the crown moldings.
At this time I selected new hinges and door pulls. I went very contempary, not my normal selection, I want a clean crisp look. Cost for the hardware was approx $300.00.

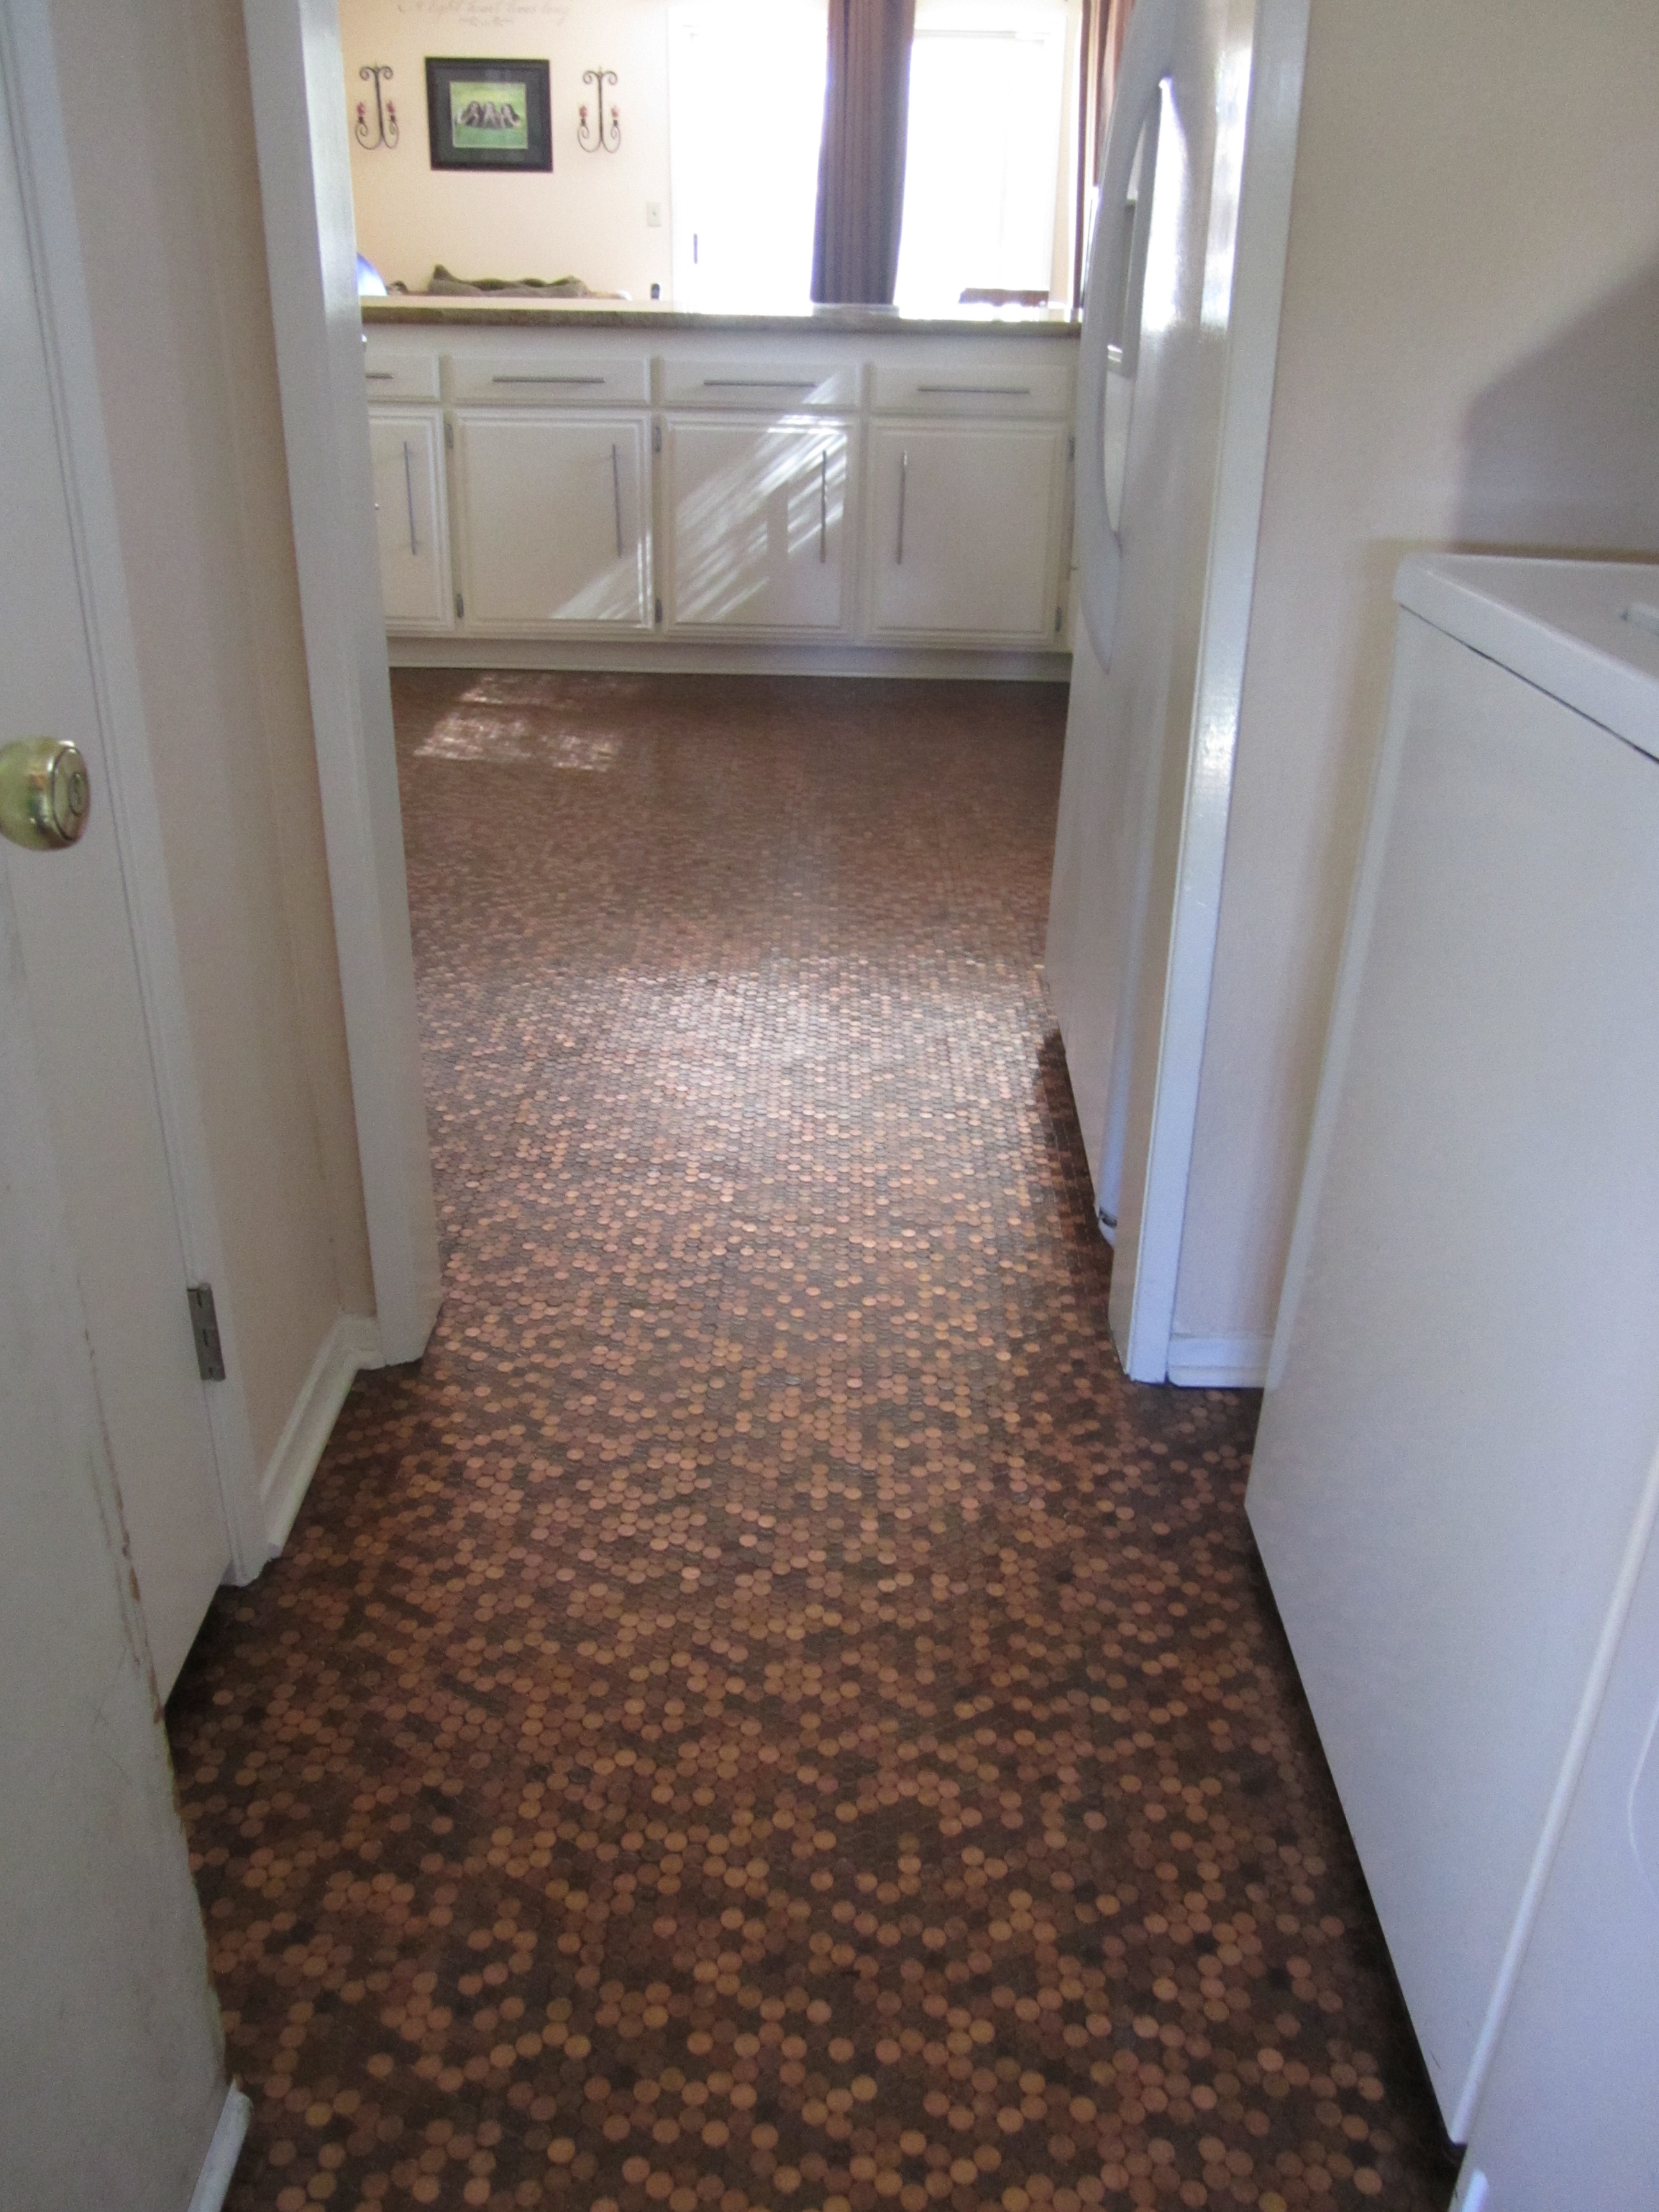
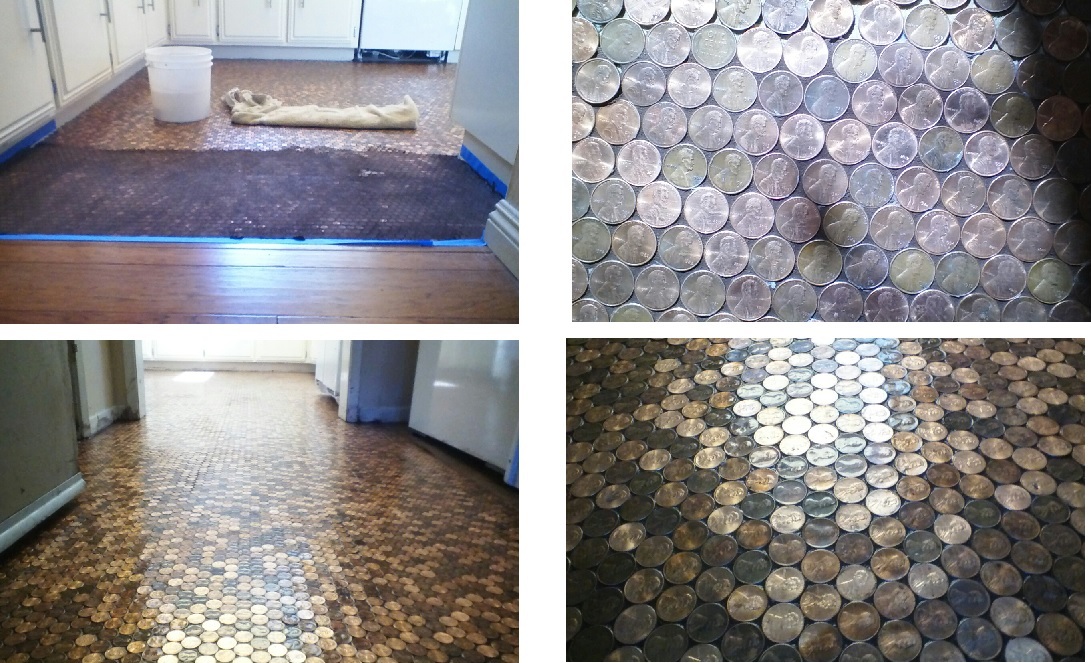
While I was painting, sanding and putting tile in, I was making penny floor squares. My kitchen floor is going to be US mint pennies. I bought fiberglass mesh to set the pennies on. In the evenings I would make these squares. Each square foot took 304 pennies, they piggybacked eachother. I wanted pennies of all colors of copper, old, new and everything inbetween. Had to make several trips to the bank buying $50 (2 boxes) of pennies at a time. Also friends and family donated pennies that they had collected... Thank You So Much! The girls would help me to unwrap and sort the pennies. What I called "rotten" pennies had to be removed. I tryied cleaning them but they all came out a color that I did not care for. In the end I had about $50 of rotten pennies which I returned.
.jpg) 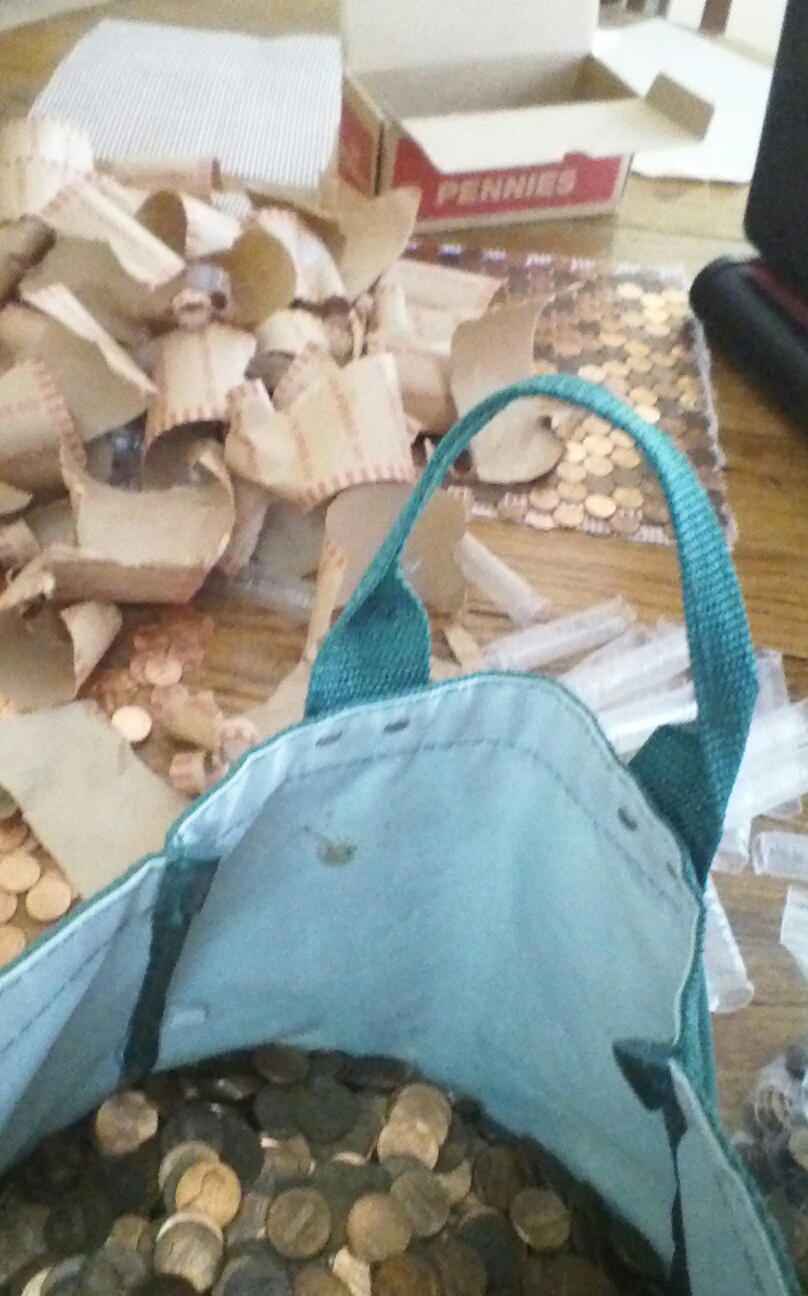 
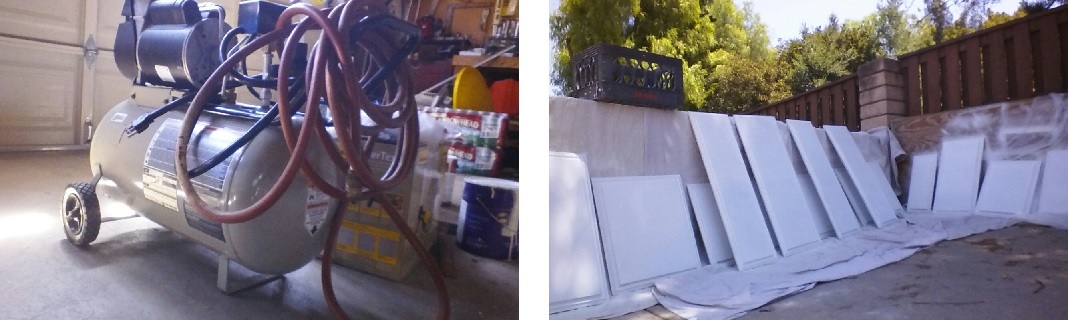
Now it is on to painting the cabinet doors and drawers, 35 of them. I worked on them in the side yard. Our friend Greg let me borrow his air compresser. I used it to prime the doors. I decided to hand paint the top coats. Just to give you an idea of how much time it took just to work on the doors. I took me 3 days alone just to sand them, these doors have a lot of detain work on them, therefore it was a lot of hand sanding to get off the urathaine finish. Between each coat of primer and paint, I had to wait 24 hours for it to dry, sanded again, and another coat. Six coats in all. It took me a couple of weeks to complete the painting for the doors. Installing them was another adventure all together.
Installed the doors and put the handles on the drawers and cabinet doors. I bought the hardware to convert one of the lower cabinets into a trash/recycle pull out drawer.
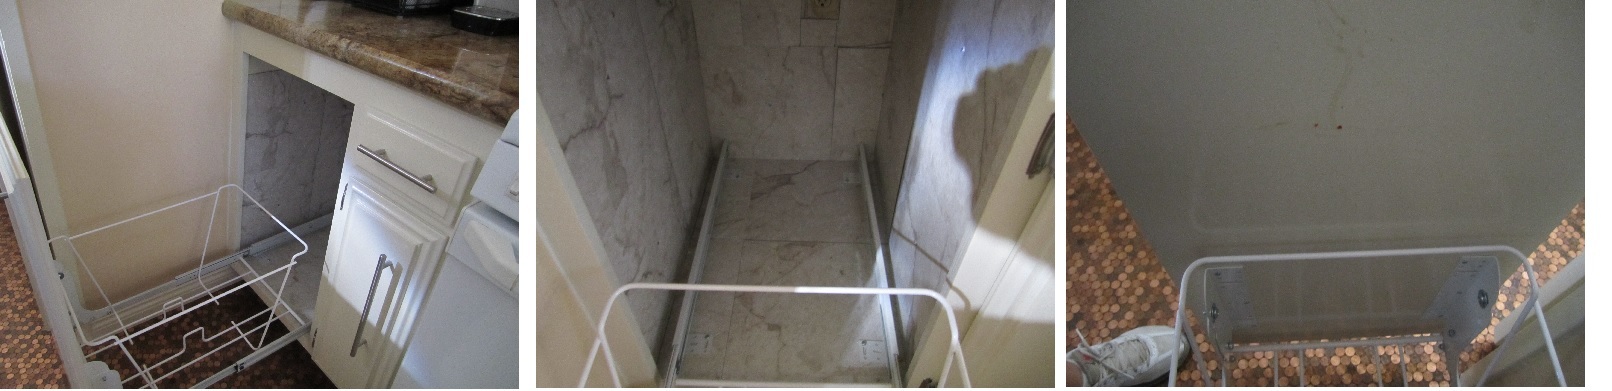
Installed the hardward, which was very easy, came in one piece. Before installation I lined the drawer with floor tiles for easy clean up. This shows how the pull out hardware connects to the back of the door.
Recycle drawer pulled out in photo. Cannot tell you how tickeled I am with this new drawer.
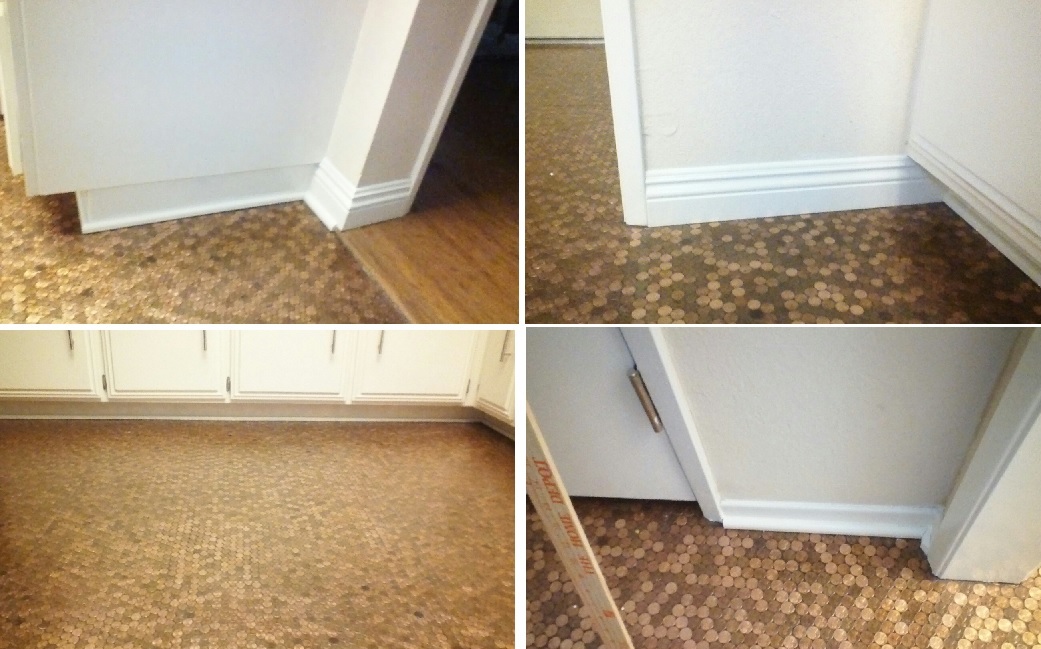
Now on to the floor. At this point I have invested $4,500. into the kitchen, most of that was for the counter/sink. My estimates of my update for the kitchen of 22,000 to 30,000, did not include a new floor. I am going to beable to get much more done than I could have if I would have had a contractor do the job. Not that what I have done was not easy, a lot of hard work, but now comes the hard labor part of this project. Out comes the old floor.
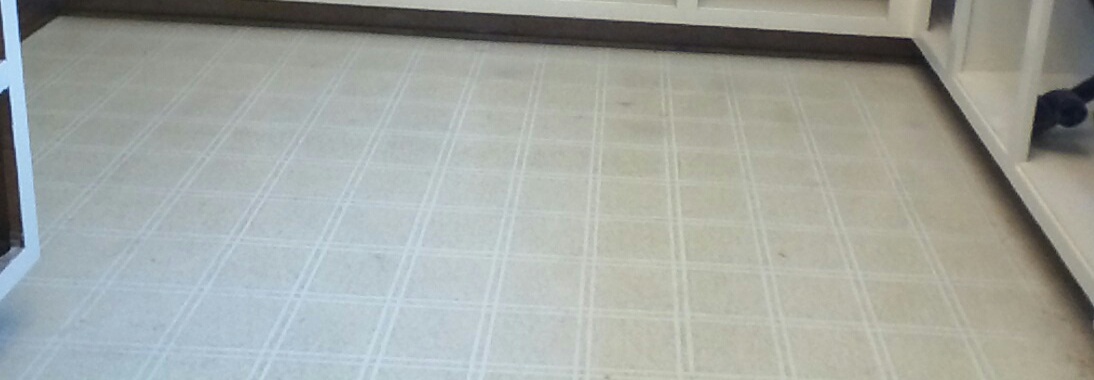
Old Floor

Wow, what a job this was to remove the floor from the kitchen, laundry room, and pantry . The top part of the floor came off with some work, the bottom paper/glue part was a pain, such a messy job.. After a couple of days I have clean cement to work with. I have to say that the floor installers earn their keep removing these floors! It was a great upper body work out.
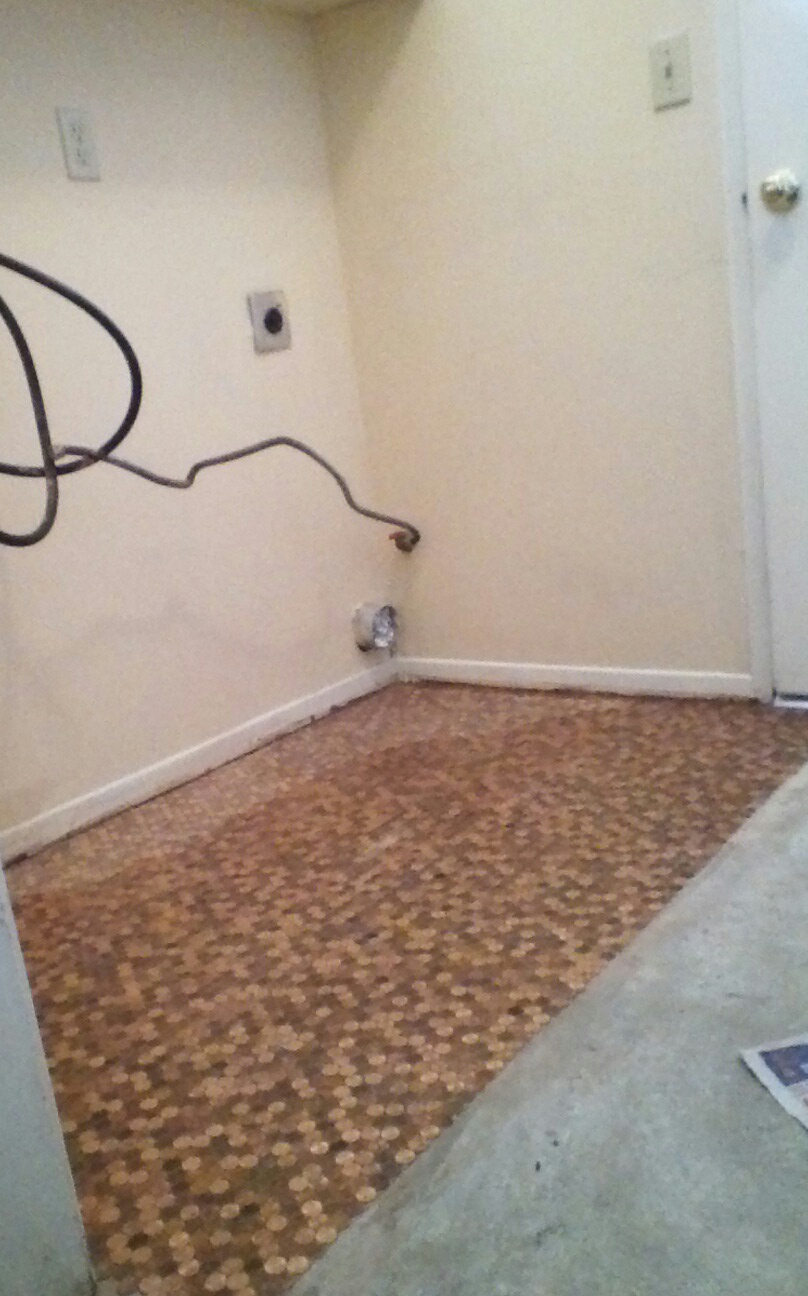
I decided to test the putting down the penny floor in the laundry room under the washer/dryer. Didn't know what it would look like or what problems I would run into so why not test on an area no one would see. After testing three diderent type of adhesives I found one that I would work. I did find that the mesh was not sticky enough to hold the pennies down when adjusting them on the floor. I was a bit upset. While using a very sticky floor adhesive, I got some on my hands, when I went to adjust the pennies into place, the pennies were sticking to my hands, by this point I was crying. After a good night sleep, I hand placed each penny to the floor in the area behind the washer. It looked good, so I grouted it. I was very pleased with the results.
Looked good, so now I will start putting down the floor in the entry of the kitchen. I had to come up with a solution with the pennies falling off of the mesh. I was sitting at the computer and noticed a bottle of Elmers glue on the desk. It came to me, Elmers glue dries clear and is flexable. So I tried it, and it worked. Flipped the squares upside down, and glued them from the back.
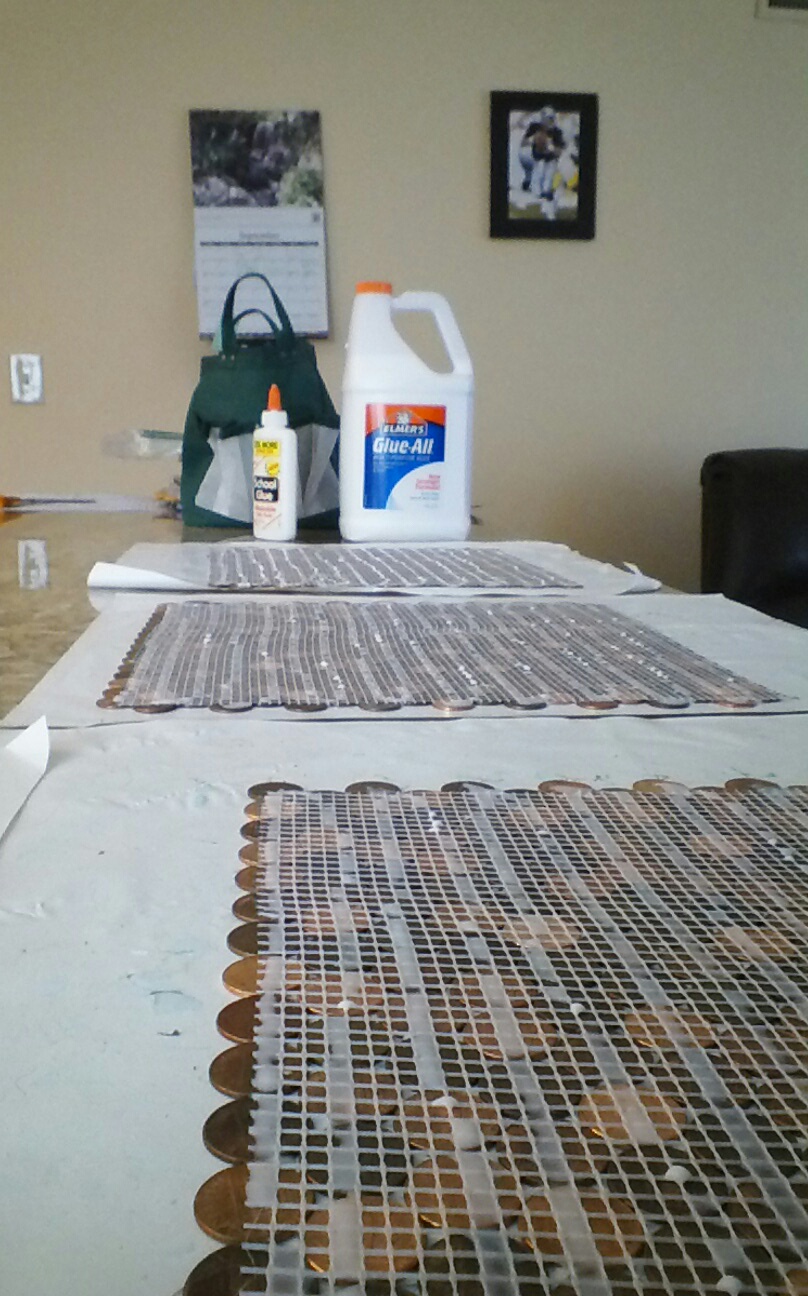
While I was not working on setting the pennies onto the floor, I was preparing my penny squares with Elmers.
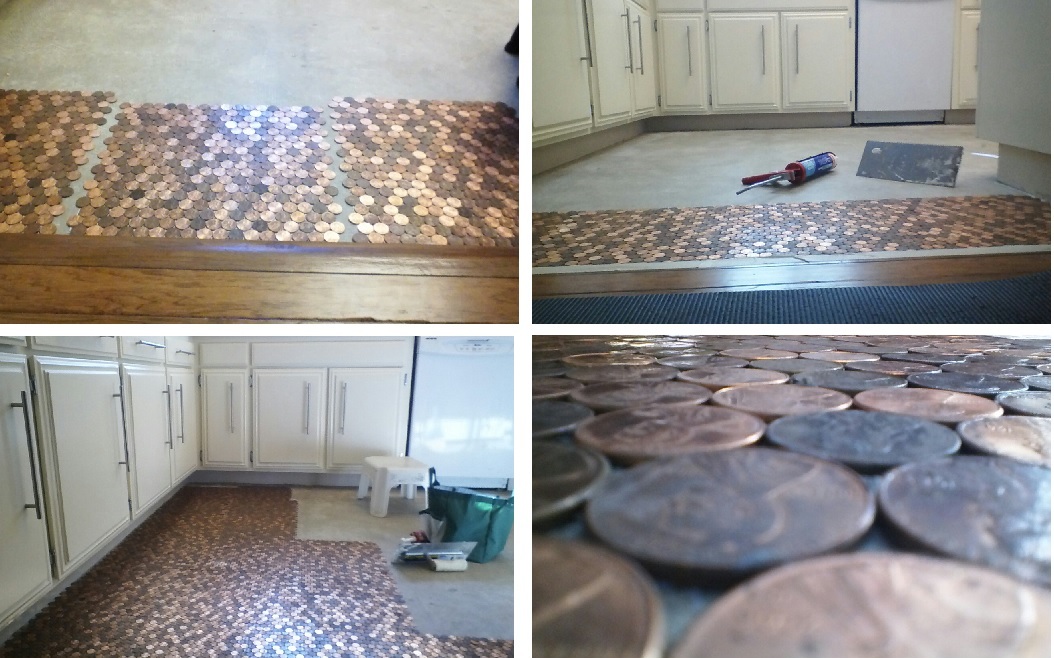
As you can see they penny squares fit together like a puzzle. As I got further along I ran into problems. The pennies are touching eachother, if they are off by a 1/16 or 1/8th of an inch they will not fit together. My penny squares had to be perfect to fit. I would find them getting out of snyc and would have to pull up sections I had to start hand placing each penny, at times I would have to trim down by cutting them to make the pennies to fit.
This is the hardest part of updating the kitchen. My back and knees were always sore. One day while loading the washing machine I noticed some water on the floor. Holy cow! the hose on the washing machine was split. I pulled back the washer to find all the pennies I had laid down a few week ago were under an inch of water, I don't know for how long they were under water but they were all black and green. I was planning on sealing and coating the pennies with polyurathaine all at the same time. I had to remove all the pennies and base boards. I had the plumber come in and replace the water spickets. At this point I decided to put dark brown floor tiles under the washer and drier.
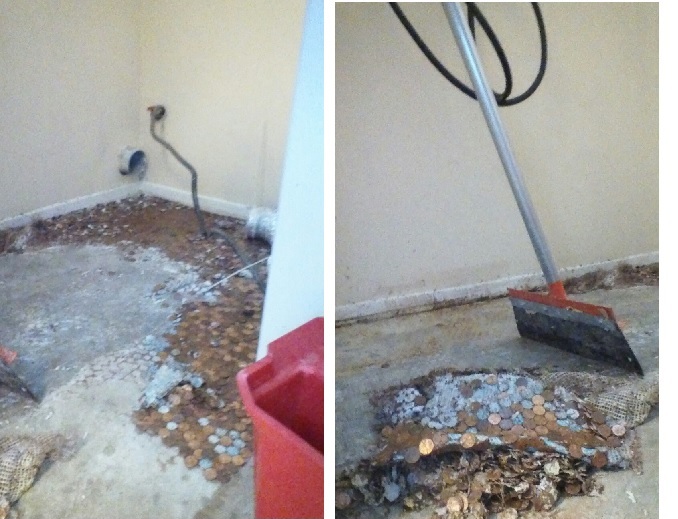
Removing the installed pennies...
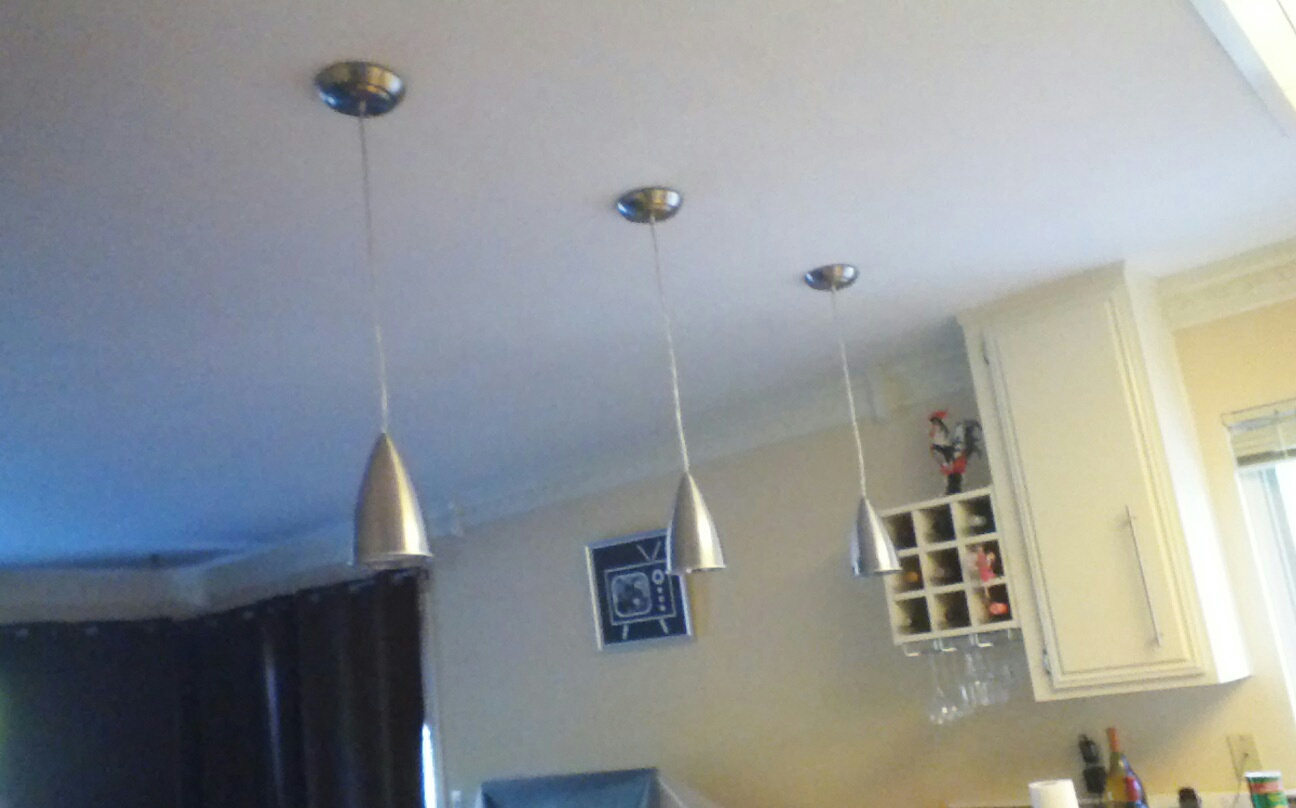
While continuing putting in the floor, I had an electrician come in and remove an old light fixture, and put in three boxes for pendant lights over the counter. I also had a dimmer switch put in.
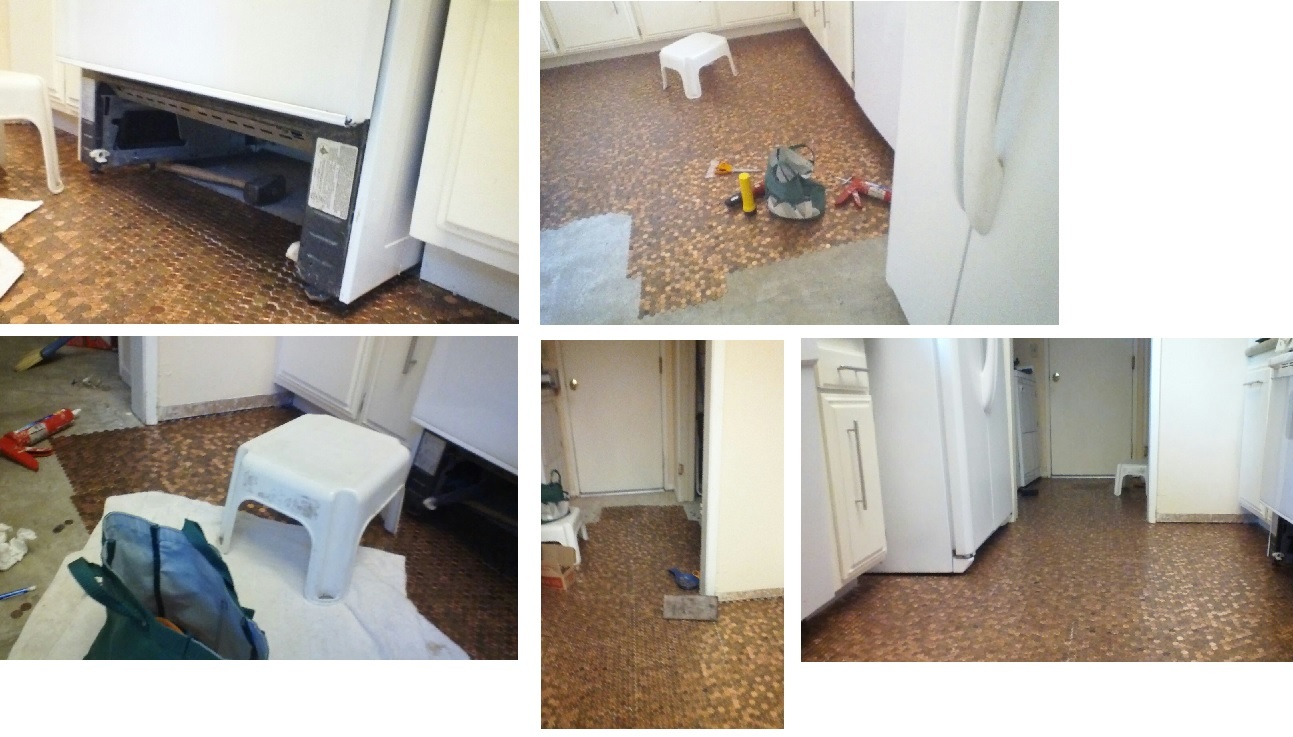
As I made progress on the floor, I got to the dishwasher. I was going to lay the pennies just out of eyesight. When I removed the lower panel of the dish washer I noticed a puddle of water. Oh no! not again. The plumber had warned me that turning on and off the water to the house can cause weak hoses to break. Well the hose to the dishwasher had never been replace since we bought the house 20 years ago.. Mike and I got right on it and replaced it, there was a hole in the water line. With that done, I continued with the penny floor and got to the stove. I had to lift the stove just high enough to get the pennies under the feet. I did that by pulling out the oven just a few inches from the wall and tilted it back just high enough to slide a large hammer handle under the stove to keep it up off the ground. It worked, and we were still able to use the stove.
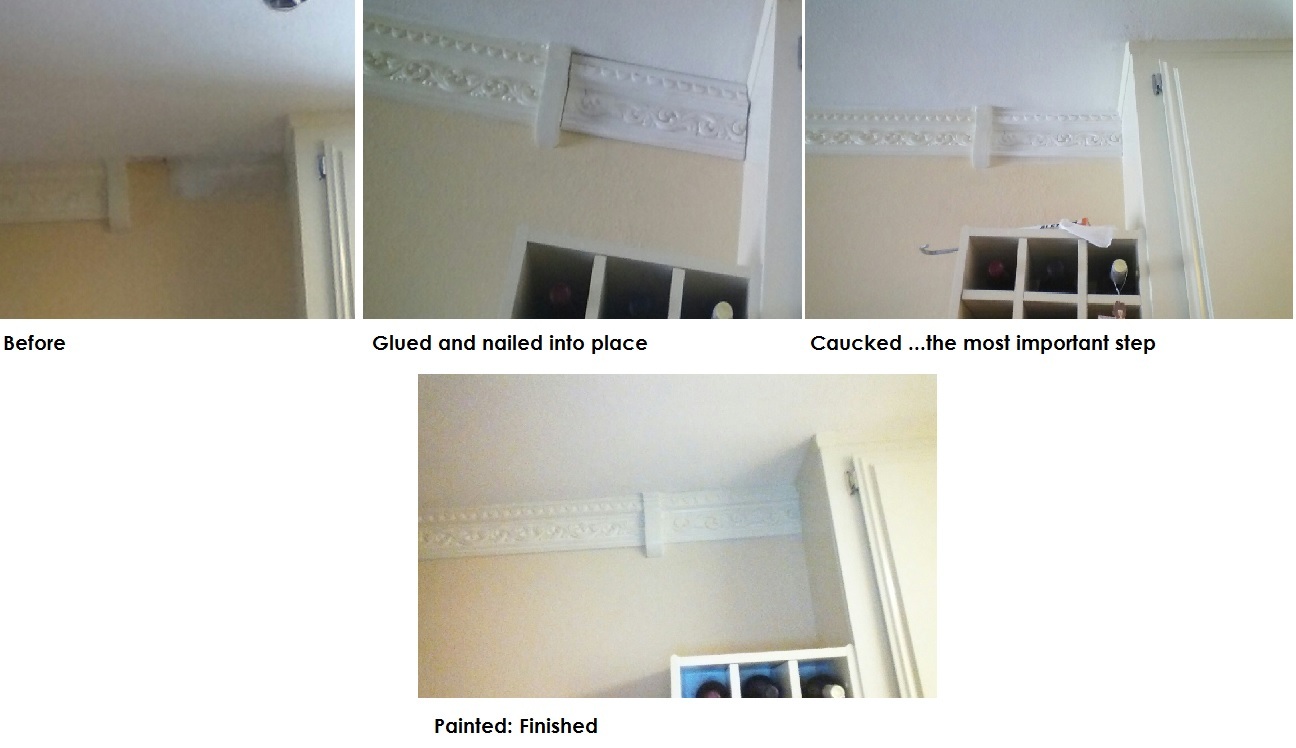
I was planning to grout the pennies next week, in the mean time I had to decided what to do with my free standing cabinet. This is the cabinet that was left when I removed the hanging cabinet between the family room and kitchen. I had an idea of putting up a wine rack... this is what I came up with. It wasn't meant to hang on the wall, that didn't stop me.
There is still detail work to do like putting in the crown molding above the wine rack. The detail work is very important for a finished look. Here are the steps involved in installing crown molding. I was the one who installed all of the crown moldings 13 years ago, the moldings are made of plaster.
Now the floors will be grouted and sealed. I grouted one weekend, and sealed it with polyurathane the next. Put 4 coats of polyurathane, sanded between each coat.
Could not walk on the floor for 3 days, only lighty after that for a week.
The pendant lights came in. Mike showed me how to connect the wires, I was able to install them in a couple of hours.
The doors and floor of the pantry had to be installed and painted. The same color tile in the pantry is under the washer and dryer. I painted and patached the pantry door, the color was the same as the rest of the cabinets.

Floor moldings came next. It is harder than it looks, can't tell you all the practice cuts I had to make. All the moldings also must be caucked and painted for a finished look.
One thing was still sticking out like a sore thumb. The cutting board was still in the orginal color, sanded and painted both sides. I also painted and textured the walls.
The last thing for the kitchen was the window treatment, ordered it online (it was a custom size), which was installed October 26th.
Kitchen is offically done.
To see the photos of the completed kitchen: After Photos of Jackie's Kitchen
Warning for those who are interested in putting in a penny floor:
A penny floor is beautiful. But, you should consider a few things before going through all that work.
How much traffic does the area get? Will there be a lot of "spills" or water? In your state, what kind of sealant or coatings are legal?
My kitchen is very high traffic, the pathway to the backyard, and laundry. Being a kitchen, lots of spills and clean up. In my state,
there are certain products that are not sold due to environmental regulations of the state. I ended using a polyurethane coating to
cover and protect the floor. I put on the recommended coats and followed all the proper preparation procedures.
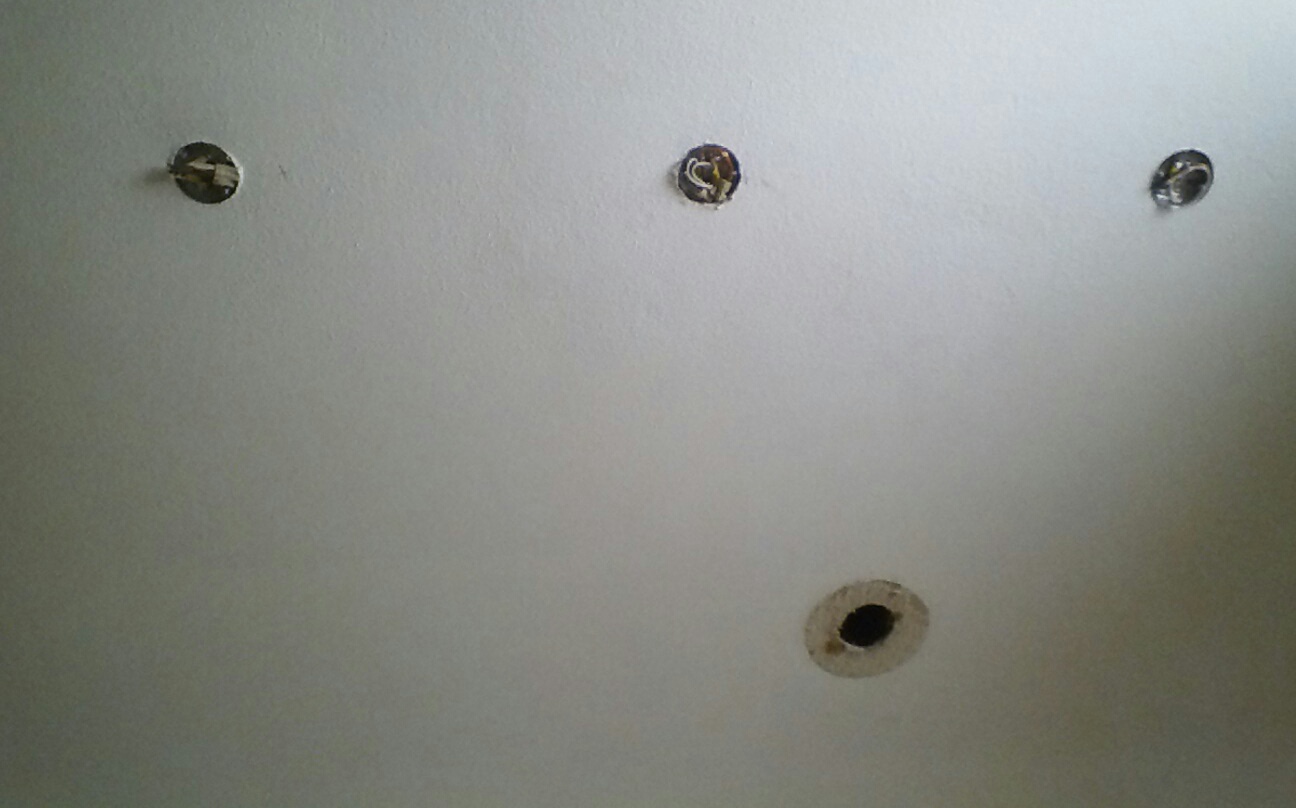
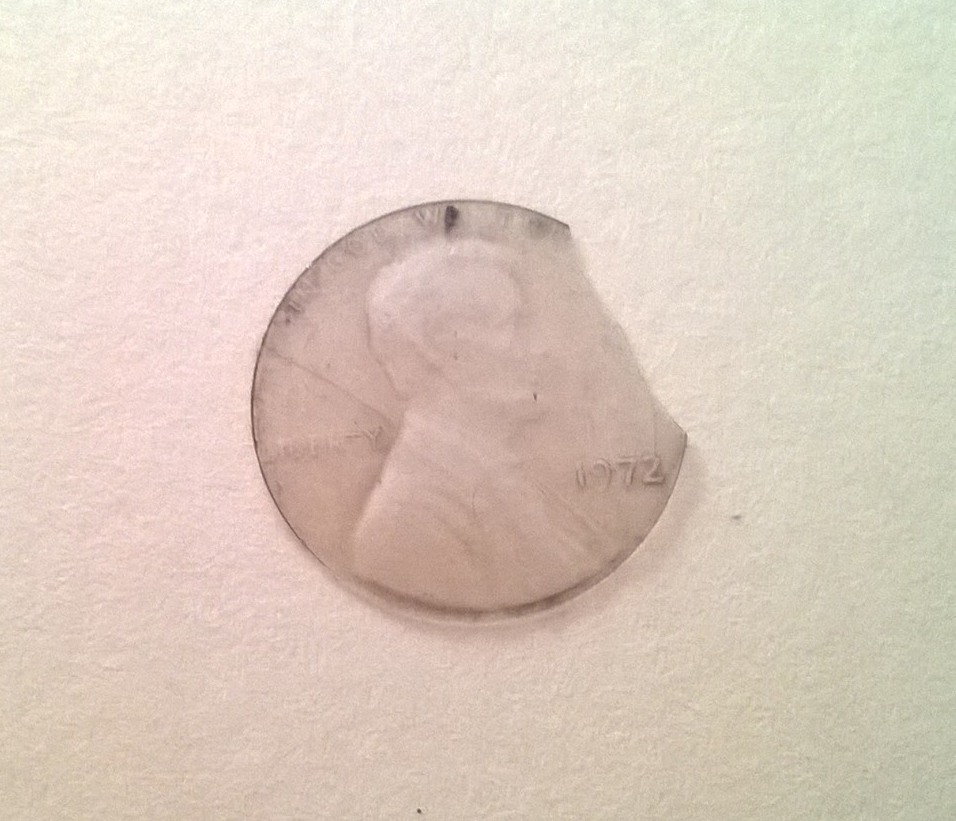
After six months, this started to happen: Pennies' have ridges. Stepping on the pennies over time cut out perfect polyurethane pennies.
(see photo). They could be found throughout the house. I did order another recommended product, but the same problem happened,
leaving the penny floor unprotected, and a continual problem of finding these bits of polyurethane all over my home.
Alas I had to take up my beautiful penny floor after 2 1/2 years. I do not regret putting the floor in, it gave me a couple years of joy,
and taught me many things... mainly that I can do just about anything I set my mind to.
 |
|